All posts should be attached to the ground. Below are the most common scenarios.
To anchor your posts for decades to come, we recommend stainless steel anchors and bolts. Our anchor kits, whether for concrete or wood decks, come with everything you need to attach your structure securely.
OPTION 1: Standard Anchor Kit
The stainless steel anchors sit on the surface and attach using either 4 expansion anchor bolts (for concrete) or 4 lag bolts (if attaching to a wood deck). The posts sit in the anchor's saddle and are attached to the anchors with lag bolts provided. A wood trim box is included to hide the hardware from view (see anchor kit installation images below).
For paver, stone or flagstone patios we don't recommend attaching directly to these surfaces because you may have cracking or movement long term. Instead, we recommend installing footings (concrete foundations for the posts) to make sure you have zero issues long term.
For most applications, we recommend digging holes 30" deep (in snow areas adjust depth to go below the frost line by 6"), place cardboard Sono tubing in the hole up to ground level (see anchorage table 1 to know the diameter). Then pour concrete flush to ground level (or level with the walking surface area of your paver or flagstone patio). Allow up to 3 days for the concrete to cure before attaching metal anchors at the top of the concrete pour (see below). You can use fast drying concrete if you don’t want to wait.
If you do not want the posts to wick up moisture, pour the concrete half an inch above ground level. The trim boxes will still drop to the floor and hide this detail.


Place the anchor where it will be installed; mark the ground as shown.


Drill for holes as shown 1/2" wide hole 4" deep and hit down the anchor bolts (1/2" x 4") with a hammer. Then take off the nut before you place the metal anchor (note: for wood deck use lag bolt).


Place and attach metal anchor to concrete with anchor bolt (1/2" x 4") and place the post.


Attach post to metal anchors with lag bolts (5/16" x 3")


Place the wood boots over the anchors, fixed it with the screws.
The photos above show the 5 simple steps to follow once your surface below the Structure is in place. Choose the anchor kit for the appropriate surface:
- Stone, Brick or Concrete - Anchor Bolts (1/2") for attaching to stone, brick, or concrete.
- Wood (e.g., Wood Deck) - Lag Bolts (3/8") for attaching to a wood deck.
Read more about anchoring your Structure in our FAQ, including the best grade of wood to choose for your climate.
More technical details:
Ideally Confirm your Structure Drawings prior to laying foundations – especially for paver or flagstone patios.
By confirming your Structure drawings first you may realize that you overlooked something or you may want to make a change that will affect the length or width. For example, for a standard 10' x 12' Arched Pergola Kit, the posts are recessed back 12 inches from the edge of the roof. This places your posts at 8' x 10' to the outside 4 corners of the posts and at 7' 6 1/2" x 9' 6 1/2" on center. If you are certain this is what you want, you can do the footings before ordering your Structure and before you receive your drawings for your order (all Structure orders receive drawings within 5 business days for your review to give you the time and tool to make adjustments before building). Often, when customers see their drawings, they decide to change some detail like adding more space between the posts or going taller.
If you are in the process of laying a foundation for a Structure that will require footings (recommended for flagstone or paver patios), it is best to have the design finalized so that you or your contractor can place the footings in the exact location. Once footings are installed you will not be able to move the post positions causing yourself an unnecessary headache.
Paver or Flagstone Patio Installation details - If you are placing your Structure on a paver patio, pour the concrete to be level with the finished pavers. This way, after adding the trim, the bottom of the trim will rest atop the pavers seamlessly. Since the paver patio is usually a few inches above grade, you may have to pour a bit higher than on undeveloped ground to get the post height to line up exactly with the paver height. The design engineer that will be assigned to your project will detail the footings work needed as part of your design work. Below is a typical set up:


| POST | ANCHOR BASES | FOOTING | ||
|---|---|---|---|---|
| Sizes | Base Steel Gauge | H | W | Deep |
| 3-3/4" x 3-3/4" | 1/8" | 6" | 14" | 30" |
| 5-1/2" x 5-1/2" | 1/8" | 8" | 16" | 30" |
| 7-1/4" x 7-1/4" | 1/8" | 8" | 18" | 30" |
| 9-1/4" x 9-1/4" | 1/8" | 10" | 20" | 30" |
| 11-1/4" x 11-1/4" | 1/8" | 10" | 24" | 30" |
If you decide to order the Anchoring Kit you’ll have all the hardware you need and will not need anything from the hardware store if you are attaching to an existing deck. If building on undeveloped ground, just add the concrete and a bit of rebar as described above. Choose the anchor kit for the appropriate surface either wood decking or stone, brick or concrete surfaces.
OPTION 2: High-Wind Anchor Kit


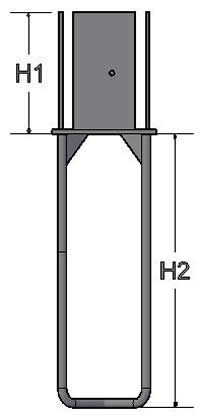


| POSTS | ANCHOR BASES | STEEL CAGE | FOOTING | |||||
|---|---|---|---|---|---|---|---|---|
| Sizes | PTR Gauge | Anchor Steel Base (PTR) | Steel Base Diameter | H | A | B | W | D |
| 3-3/4" x 3-3/4" | 1/8" | 6" | 3/8" | 12" | 7" | 23" | 14" | 30" |
| 5-1/2" x 5-1/2" | 1/8" | 8" | 3/8" | 18" | 9" | 29" | 16" | 36" |
| 7-1/4" x 7-1/4" | 1/8" | 8" | 3/8" | 18" | 11" | 29" | 18" | 36" |
| 9-1/4" x 9-1/4" | 1/8" | 10" | 1/2" | 20" | 13" | 35" | 20" | 42" |
| 11-1/4" x 11-1/4" | 1/8" | 10" | 1/2" | 24" | 17" | 35" | 24" | 42" |
Note: At least 3-1/2" clearance between edge of footing and anchor is recommended.
The High Wind anchor is rated to withstand winds of up to 150 mph. They are made from 100% Stainless steel. See chart above for typical recommended footing depth, but the final footing design will be part of your final approved working drawings that you will receive as part of the ordering process. They are normally installed at a 30 to 42 inch with a significant portion of the anchor in concrete underground as shown in the drawings above. For best results, we recommend doing the concrete work at least 3 days ahead of the Structure install so the concrete will cure prior to attaching the Structure to it. You then place the wood posts in the cradle and bolt the wood to the anchor. We supply wood trim pieces to hide the hardware so the bottom of the posts look like they have a wooden boot around them when installation is complete.
Note: If your Structure is placed in a snow area, the concrete must be 6 inches below the frost line.
Frost Line Map across the United States
 This map is from the National Snow and Ice Data center and shows the frost line map across the United States. Note how it moves down from 72-inches depth to a 6 inch depth.