General Questions
I have question about your Pergolas and the 2x6 rafter span which states they can go 20 feet with just 4 posts. While our design is closer to 14 feet (11 feet between posts) I am concerned with sagging of the 2x6s with such a large span. Coincidentally I was reviewing a plan which is on the CA Redwood Assoc. website which has an example of an 8 x 12 Pergola (Windsor Shade Shelter) which recommends a 2 x 6 rafter span of no more than 6 feet.
Yes, if you are just stacking individual 2x6's, you cannot go anywhere near 20' in length. I think a 6' span as mentioned by the CA Redwood Association is a bit conservative, but I understand they don't want any unhappy customers.
The way we can do it and have been doing it for decades now is with extensive notching. When you notch all the timbers of a pergola into one another, they share the structural strength of the neighboring timbers. We do the notching in both directions and it achieves a multiplier effect in terms of structural strength. And, equally important really is that the notching locks the timbers in place so that even if one timber wanted to twist or sag - it cannot move. Lastly, you must use fully season lumber at 12% moisture content or less. You definitely will have movement issues if your lumber is green or semi-dry.
Is there a waterproof ceiling on the Humboldt Pavilion 14x14 or 14x16?
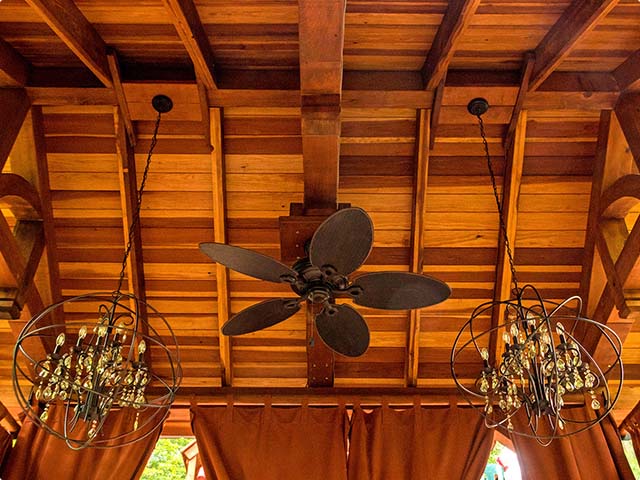
Thank you for your email. The tongue & groove pavilion roofs are made to showcase the lumber from underneath. It is just about waterproof as shipped, but you want to add roofing material after installing. Felt paper and shingles is the preferred final roofing skin but you can do just about anything other than tiles. You do not want to use tiles because they are too heavy. You do not want to leave the beautiful tongue & groove roof exposed to year round weather. Even though it is Redwood, it just isn't recommended because the wood will move from being scorched in the summer and soaked during the wet season.
Is Redwood available Pressure Treated?
Redwood is not pressure treated because it is very decay resistant naturally. The woods that are typically pressure treated are pines because they otherwise decay quickly.
Do you have any other types of material, e.g. vinyl, fiberglass, etc.?
We use excellent quality redwood because it's the most decay and insect resistant wood that grows naturally in North America. The best value is to go with our Mature Redwood. It is guaranteed against decay for 20 years and will easily last longer and is reasonably priced. Vinyl, fiberglass and other products are less expensive, but you'll wind up having to replace them sooner.
How does Forever Redwood compare to local contractors for building a pergola?
Our redwood timbers are cut extra thick. If you are comparing with local contractors, keep in mind the timbers will be thinner than ours when comparing pricing.
Also, our kits have all the timbers notched into every other timber. The notching is the secret to making a strong and attractive pergola. If a local contractor will agree to do all the notching, they will probably not be able to do it for our pricing. The notching is very labor intensive. We can do it reasonably because we have developed custom equipment in our shop to do it in just a couple days.
Can you build a pergola around a cut-out in my roof line?
Absolutely! For an idea of how a project like this could work, take a look at the drawings below. Before we ship your pergola, we'll talk with you to determine your exact needs, create set of AutoCad drawings for your approval, modify the plans as needed, and then build the pergola to your specifications. It will arrive at your door within 2 to 3 weeks.
(Please note: we ask for a 50% deposit before we begin work on the drawings, as it is a time-consuming process, but well worth the time!)
Do you do custom orders?
Thank you for your detailed email. We can make a beautiful pergola for your second story balcony. There are many ways to do this. From the drawings, it looks like the pergola is approximately 23 feet wide and about 10 feet tall. Because you are in California, we can deliver, assemble and install it for you. If the pergola roof exceeds 20 feet in width (it looks like it does), we'll have to add a third post to support it. Attaching to the house shouldn't be a problem.
Total cost including delivery, assembly, installation and sales tax will be between $6,400 to $9,700 depending on the size and the options you choose. To figure an exact quote I'd need the following:
- The exact height, width and length of the pergola's roof you'd like.
- Whether you'd like the rafters and roof timbers to be spaced the standard 18" on center or if you'd like more shade and have them spaced 15" or 12" on center. Going to 15" on center spacing increases the amount of wood and the price by 7%. Going to 12" on center spacing adds 12% to the 18" on center price.
- The grade of redwood you choose (read more about our grades of wood). The redwood grade you choose will lower or increase your price within a 30% range.
We will try to reach you by phone to discuss further. Once we've agreed on the details, we can have the set built and installed in 2 to 3 weeks. Thanks again for considering us.
I want a lot of shade under my Pergola. Can you place the roof slats closer together?
The roofs slats can be set closer together at whatever spacing you like. However, going to just 3 inches on center will create much more shade than you are imagining—it will create almost a closed roof. The slats are 1.75" wide each. At 3 inches on center, you only have 5/8" of an inch of open space between the each slat. You'll block the view of the sky completely and have over 80% solid wood on the top layer of the roof. If you then figure the 5.75" tall rafters below are set at 18 inches on center and also block a lot of sunlight (since the sun is at an angle most of the time), you will have nearly 100% shade under the pergola at most hours of the day except when the sun is directly overhead. The extra roof slats will add 11% to the original cost estimate. If you still would like to proceed, consider a maximum of 6 inches on center when doing the assembly (don't screw them in—just place them at 6 inches on center) and see how it looks and how much shade it provides. Then, after a day or two, go back and either screw them in at 6 inches on center or go ahead and add more to get to 3 inches on center. It is doubtful you'll want to place them at 3 inches on center because you'll lose the ability of seeing up and not gain much additional shading. You'll have over 80% shade most of the time at 6 inches on center, which is the closest together any one of our customers has ever placed the roof slats.
Roof Questions
I want a very open Pergola roof. Can you leave the roof slats off?
The top stringers—what we call roof slats—are important structural elements. They are notched into each rafter below to make the super-strong "web" design of our pergola roofs. Without any of the 2×2 roof slats, I think you'll have difficulty getting the permits approved unless we make some other structural adjustments. For example, you'll have to place metal ties at each juncture between the rafters and the roof support timbers.
The roof support timbers are precisely that—they are the horizontal 2×6's that are notched into each side of the posts and they hold the rafters that sit atop and perpendicular to them. Each rafter is notched into the roof support timbers below it, but to really strengthen the pergola roof to resist high storm winds in Florida, I'd recommend keeping at least some of the 2×2 roof slats above them.
If you'd like to have 12" on center rafters, we can design the structural details in a couple ways. For example, if you don't mind some "stringers" (roof slats), we can place them either 24" or 36" on center to just serve as extra strengthening without creating too busy of a structure. Or, if you really do not want any roof slats in the design, we can then place metal "l" brackets atop the roof support timbers between each rafter that tie to each side of each rafter. It will barely be visible from below and should be fine for the county permit also.
Do you have a pergola design that is covered in the middle of the roof with the two sides of the roof with just the slats?
We do not have a design like you are describing, but it will not be difficult to create one. We have a curved roof design. Below is the link to our Arched Pergola Kits.
The Arched Pergola roof can have lattice panels or it can be an open timber roof design like you are wanting for the sides. Just take a look at some of the photos in the link above.
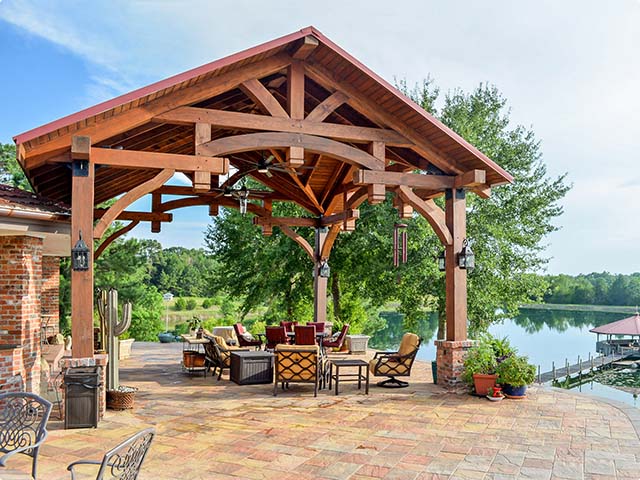
And we have a covered roof design that has a tongue & groove roof. We can make part of the roof you want this way for 100% shade and some protection from rain. Just take a look at the photos below:
The Del Norte Outdoor Kitchen Pavilion
We can basically build the structure any way you like. I will ring you later in the am when I get to the shop to see if I can answer any questions.
Engineering & Permits
Can you help me with permitting if necessary?
We can send detailed drawings and basic structural calculations, but you'll best be served by taking them to a local architect to adjust to local requirements to pull the permits. Each local government's building department approaches pergolas in a different manner. Some are easier than others and it is not practical to attempt to navigate the local rules from California. The smaller pergolas (under 120 square feet) usually do not require permits, but a large pergola likely will.
Once we've figured out what we are building—the dimensions, wood grade, finish option, and features—we'll send a detailed invoice for your approval. Since you want to attach the pergolas to your house, we'll need some photos of the install areas to make sure every issue is considered ahead of time. Nothing fancy—just a couple digital photos from different angles so we'll understand what you are doing and can make the drawings taking what is already in place into account.
After a deposit has been placed on the order, the first thing we'll do is prepare a set of auto cad drawings and specific structural calculations for the roof and posts of each structure (3 business days). You can then review the drawings and make any necessary adjustments. We'll turnaround the final drawings back to you within a couple business days to then take to your architect to fine tune for presentation to the local building department. Although we normally make our own structural metal connectors for the pergolas, if you're pulling permits for your pergola it is often best to use "off the shelf" connectors from the hardware store (like Simpson Ties, for example).
Post Anchoring
Can I buy your Post Anchor kits separately?
We do not sell our mounting kits for our posts unless it is part of an order. They are labor intensive to make and are over engineered as a courtesy to our Pergola customers. In other words, they weight a ton and are too expensive to make and ship alone without a big Pergola crate!
If you want to go with a 1/4 inch thick steel anchor kit for your posts, your best bet is to have a local welding shop make them.
What clearance does the Anchor Kit provide
The anchors are 1/4"-thick steel. So, by placing them on the concrete they will indeed automatically raise the wood posts off the ground by your required code. Plus, the anchor bolts will not sit completely flush at the base of the anchors, so this will add another 1/32" or so height off the ground. Also, we recommend taking a few minutes to add some paint (oil-based is best) to the bottoms and first few inches of the posts. Add a couple of coats to make sure they are 100% sealed up. For the tropics where there is an almost endless supply of water, this will make sure the bottom of the posts wick up as little moisture as possible. Since you are using our anchoring kit, the included wood trim pieces will hide the paint at the base of the posts—so if you have old, extra paint lying around, this is a great way to put it to good use.
Are your Pergola Anchor Kits used on concrete only?
We've built pergola kits for wooden decks many times. Sometimes, if the pergola is rather large (over 120 square ft), the customer winds up deciding to order some or all of the posts longer in order to anchor them to a support beam below deck level. You can then tie the pergola posts to the support beam with long carriage bolts.
How the pergola is attached really depends on your deck's structure and the size of the pergola you are considering.
A five minute phone conversation usually covers any questions. If you prefer email, send a couple photos of your deck, along with the pergola size you are contemplating. We will take a look at your situation and offer a suggestion on how to best secure the pergola for long term safety and enjoyment.
Can I buy the anchor kit separately?
We don't sell the anchor kits without the pergolas. They are welded by hand and we include them at a discounted price on our site as a convenience to our pergola kit buyers.
How do you anchor Pergola Posts in the ground?
We are in the first stages of laying out a ground-level patio that is 12 feet squared. We have dug up the ground, laid plastic, and several feet of sand. The area is also leveled, and tomorrow we will be digging a trench for weeping tile around the top side of the very small slope that the patio lays on.
I have seen the photos on your web site on how to install the 4 posts into a cement style flooring. But, we will be laying down slate, granite, and stone of all different sizes onto the sand. How do we go about stabilizing the 4 main posts? My husband thinks we need to go just outside of the 12 foot square on each corner, dig post holes, level them, and fill the holes in as the starting point. Is my husband on the right track?
There are many ways to do it. You can attach the posts directly on the slate with our anchoring kit, but the slate may crack at installation or down the road. Ask your slate contractor how much weight/stress it can take. The pergola will add about 300 lbs per post. You can do as your husband suggests, and place the posts outside the slate deck. Dig 3 feet down, add a bit of rebar and then fill with concrete. The structure will always be stronger if you bury the posts 3 feet in the ground.
If you don't like the idea of having the posts outside the slate deck, build the pergola prior to placing down the slate. Place the posts where you'd like and do the same as mentioned above. Then build the slate deck around the posts. If you decide to place the posts within the slate deck, just keep in mind when pouring the concrete for the posts to pour to only within a few inches of ground level. This way the concrete around the post base will not interfere with the slate installation afterwards.
If we simply dig down the 4 feet, just below the frost line, then line each post up straight, back fill in, wouldn't that be good enough, or would we have to do each post in cement?
Yes, you can do it the way you are describing, but it won't be very strong and may move around over time. If you don't want to use cement to save money you can do it the old-fashioned way. In the old days, fence posts were secured by jamming medium sized rocks into the hole with a steel rod. This is still done as an effective way to secure posts inexpensively. Just place the post in place below the frost line and add just enough backfill dirt and small stones to keep it level and upright. Then start throwing in larger stones/rocks and jam them in. Continue until you are just a few inches from the top. Then add dirt to finish and seal it up. Or, to make it a bit stronger–and not spend much money–you can add just a bit of concrete. Water the mix so it will seep down through the stones to the bottom of your holes. The post holes don't need to be more than about 10" to 12" wide.
How should I anchor my pergola post?
What's the difference between anchoring pergola posts above ground, and sinking them 3 feet under?
You can do it both ways, but sinking the posts is a better alternative if you're going to buy the pergola in the Mature or Old-Growth Redwood. Both wood grades are very decay resistant in moist conditions (like underground) and will hold up fine for decades. The Redwood wood grade will only last 15 years if buried 3 feet underground. This is the reason both anchoring options are mentioned.
Sinking the posts is a structurally stronger way to attach the set. You'll pay a bit more for the longer posts, but you don't have to buy the anchoring kit. Some customers like the trim pieces around the base of the posts even when they are sinking the posts in the ground. If you are planning on sinking the posts and want the trim pieces, just let us know in the "Comments/Special Requests" box. We'll send them at no extra charge. If you are in a relatively dry climate (less than 20 inches of rain per year), the Redwood wood grade is the best investment because it will last a couple decades in the drier climate and is less expensive than Mature or Old-Growth Redwood. If you're going with the Redwood wood grade, do the concrete work and attach above ground for a long-lasting structure. If you're planning to purchase the Mature Redwood, sink the posts and order them 12 feet long.
We rarely sell pergola kits in Old-Growth. It's an exquisite wood most of our customers order for furniture instead. We will gladly build your pergola in Old-Growth if you prefer, but for most parts of the country, your best investment option in relation to durability is the Mature Redwood. It will last 25 to 30 years without maintenance even in severe climates, while the Old-Growth may last 5 to 10 years longer but at a significant price premium.
For all anchoring of the posts, you will need metal anchors and bolts. You can purchase these at your local hardware store or just add our anchoring kit to your pergola set so you will have everything you need to assemble and attach your pergola. Our anchor kits, whether for concrete or wood decks come with everything you need to attach your pergola securely. The metal anchors sit on the surface and an anchor bolt (for concrete) or a lag bolt (if you order your kit for a wood deck application) is attached directly to the surfaces below. The posts sit on top of the anchors and are attached to the anchors with lag bolts provided (2 per posts). Wood trim is included to hide the metal from view. See anchor kit installation images below.
For paver patios and for flagstone patios we don't recommend attaching directly to these surfaces because you may have issues of cracking or movement long term. Instead we recommend installing Footings (concrete foundations for the posts) to make sure you have zero issues long term. For more details see technical details.
Whether for a paver patio, flagstone, or any other surface that is not a solid concrete pad (undeveloped ground also), what we recommend for a zero maintenance installation is to dig holes 30" deep (in snow areas adjust depth to go below the frost line by 6”) and place 8" diameter cardboard Sono tubing in the hole up to ground level. Then add some metal and rebar. Pour concrete flush to ground level (or level with the walking surface area of your paver or flagstone patio). After allow a few days for the concrete to cure, attach metal anchors at the top of the concrete pour (see above). By going with an 8 inch diameter concrete pour, when you finish attaching the posts to the anchors and adding the trim, the posts at the base with the trim wind up being 8 1/4" x 8 1/4" and they hide the concrete from view from above. The posts with the trim will look like they are just sitting on the ground or the flagstone or pavers.
If you do not want the posts in the weather and do not mind being able to see the concrete from below, pour the concrete about two inches above ground level.
Anchoring Kit Installation
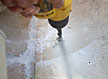
Step 1: Attach metal anchor (made with ¼” thick steel) to concrete with anchor bolt (½” x 4”) (note for wood deck lag bolt)
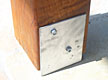
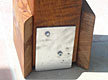
Step 2: Attach post to metal anchor with lag bolts (5/16” x 3”)
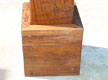
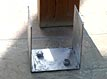
Step 3: Add wood trim to hide metal when finished
The photos above show the 5 simple steps to follow once your surface below the Pergola is in place. Photos show a brick patio. Choose the anchor kit for the appropriate surface:
- Stone, Brick or Concrete - Anchor Bolts (1/2") for attaching to stone, brick, or concrete.
- Wood (e.g., Wood Deck) - Lag Bolts (3/8") for attaching to a wood deck.
More technical details:
Ideally Confirm your Pergola Drawings prior to laying foundations – especially for paver or flagstone patios.
By confirming your pergola drawings first you may realize that you overlooked something or you may want to make a change that will affect the length or width. For example, for a standard 10' x 12' Arched Pergola, the posts are recessed back 12 inches from the edge of the roof. This places your posts at 8' x 10' to the outside 4 corners of the posts and at 7' 6 1/2" x 9' 6 1/2" on center. If you are certain this is what you want, you can do the footings before ordering your Pergola and before you receive your drawings for your order (all Pergola orders receive drawings within 3 business days for your review to give you the time and tool to make last minute adjustments before building). Often, when customers see their drawings, they decide to change some detail like adding a bit more space between the posts or you may want to add a foot or two to the length or width.
If you are in the process of laying a foundation for a pergola that will require footings (recommended for flagstone or paver patios), it is best to have the design of the pergola confirmed so you or your contractor can incorporate footings in the exact location (see descriptions of footing above). Once footings are installed you will not be able to move the post position after reviewing the drawings without causing yourself an unnecessary headache.
Paver or Flagstone Patio Installation details - If you are placing your pergola on a paver patio, pour the concrete to be level with the finished pavers. This way, after adding the trim, the bottom of the trim will rest atop the pavers seamlessly. Since the paver patio is usually a few inches above grade, you may have to pour a bit higher than on undeveloped ground to get the post height to line up exactly with the paver height.


Step 1: Attach metal anchor (made with ¼” thick steel) to concrete with anchor bolt (½” x 4”)


Step 2: Attach post to metal anchor with lag bolts (5/16” x 3”)

Step 3: Add wood trim to hide metal when finished
Metal Anchors from you local hardware store - You can save a bit by using off the shelf metal anchors from the hardware store. Just make sure you avoid the 2 most common mistakes: often they are taller than ours and can't be hidden as easily with trim. But, if you prefer to use off the shelf anchors, you can set them in the concrete footing ahead of time and let us know how tall they are above the concrete. We can make custom trim pieces for them at a reasonable cost (usually about $30 for a set of 16 pieces for the 4 posts). And, just be certain the anchors are set to the exact dimensions and the corners are squared.
How should I attach the pergola posts to my deck framing?
I am concerned regarding the method of attaching the pergola posts to my deck framing. What is your experience here? The deck is framed with 2×10 and currently decked with plywood. It has yet to be waterproofed and can be torn up if needed. Should we use Simpson Ties or the like to mount the post to the deck joists?
You can attach the pergola using off-the-shelf "Simpson Ties" brand metal anchors. Just lag bolt them into the wood framing of your deck and then bolt the posts to the decking.
All the timbers are notched into one another to distribute stresses throughout the structure. The roof slats at the top of the roof are notched into the roof rafters below. The roof rafters are notched into the roof support timbers and the roof support timbers are notched into the posts. All the notching creates a "web effect" that is structurally very strong. All the timbers are full dimension. For example, the roof rafters are real 2" x 6" (not like a hardware store 2×6 that is really only 1 1/2" x 5 1/2").
All of the hardware used to reassemble the pergola is included and is stainless steel—except the post anchors. Whether you purchase our anchoring kit or use Simpson Ties, these are standard steel (cannot get the ties in stainless). If you order our anchoring kit, we'll send the metal anchors, anchor bolts (for concrete) or lags (for securing to wood decks) plus the lag bolts to bolt the posts to the metal anchors. Our anchor kits include the wood trim pieces to create a "boot" around the base of the posts to hide the metal in an attractive way.
What clearance does the Anchor Kit provide?
The anchors are 1/4"-thick steel. So, by placing them on the concrete they will indeed automatically raise the wood posts off the ground by your required code. Plus, the anchor bolts will not sit completely flush at the base of the anchors, so this will add another 1/32" or so height off the ground.
Also, we recommend taking a few minutes to add some paint (oil-based is best) to the bottoms and first few inches of the posts. Add a couple of coats to make sure they are 100% sealed up. For the tropics where there is an almost endless supply of water, this will make sure the bottom of the posts wick up as little moisture as possible. Since you are using our anchoring kit, the included wood trim pieces will hide the paint at the base of the posts—so if you have old, extra paint lying around, this is a great way to put it to good use.
Looking at purchasing a custom pergola for a private park in Florida. Are you able to confirm that your products cam meet Florida wind loads (140 mph)?
Thank you for your email. Our Pergolas are very strong and we can beef them up with whatever hardware your local code may require. We also have high wind anchors for the posts. We have shipped many pergolas to Florida and have met the individual county requirements for permitting. We will prep detailed drawings of your order that you can then take down to your local permitting office for input on what additional documentation they will require. We can provide structural and wind calculations with our CA based engineer, but for the hurricane certification end of things, you will probably have to get a local structural engineer to add a few touches to the documentation to have it pass for permitting. Once we have done the heavy lifting in terms of design and structural and wind calcs, if you present this semi-completed package to your local engineering firm, the cost is usually under $1,000 and often under $600.
Hope this is clear. I will ring shortly to make sure I have answered all your questions.
Thank you
Structural Strength
I'm considering buying one of the garden pergolas from your website. The size i'm interested in is 16'x16' using redwood lumber Based on the technical specs "Roof support timbers and Rafters are 1 7/8" x 5 3/4" for all Pergolas styles (Garden, Enclosed and Arched). Roof slats are 1 3/4" x 1 3/4" for the Garden and the Enclosed Pergolas."
What is the beams size/supports will be included in this 16'x16' pergolas?
We take several steps to make sure the support structure for the Pergola roof is significantly overbuilt.. First, we use double beams on each side of the structure to support the roof, not just one per side as most of our competitors do.. The beams are notched into the posts and rest on them from both the inside and the outside of all the posts. For a 16 x 16, you have four 16 ft beams that run the entire length of the structure. The beams are blocked at a couple points to tie them together. The beams are 1 7/8" x 5 3/4" each and the blocks are approximately 12 inches long, 5 3/4" tall and 2 3/4". wide and are tied to the 2 beams with stainless steel carriage bolts at several points for maximum strength.. There are also diagonal braces that come out from posts and extend out about 18 inches on each side. The end result is that for a 16x16, the internal spacing between the 4 posts is 13' 1" and with the diagonal bracing, the span is reduced to less than 10 feet. Then we add the blocks in that 10 ft span so the beams have the strength of a 6 1/2" wide beam in total (1 7/8", 1 7/8" and the blocks 2 3/4").
Will the above specs be strong enough that creates sagging issues over time?
No. The beams as installed cannot sag ever. Just way over built and having it be a combination of 2 different beams with different grain patterns plus the blocking and bracing the span is significantly reduced also.
Would it be an issues with the structure/sagging if i have wisteria tree grow to the top of the roof slats?
Not a problem for sagging. You will just have to be OK with not being able to refinish the Pergola over the years because the Wisteria would be damaged. We have many customers that grow vines. Wisteria can get heavy if left unattended, but this will not be a structural issue for the Pergola.
Is there an option for me to upgrade the rafters to 3x6 or even 4x8 and what would be their respective support beam size would be?
We will prepare a drawing of the structure as soon as you order it. Will take up to 3 business days. You will be able to see all the structural details and dimensions, including what I have explained above with the dual support timbers, the blocking and the diagonal bracing. If you are concerned and want to make any of the timbers thicker or taller, we will happily do this for you and make new drawings. If you build up some timbers, it often throws the proportions for the others off and you have to beef the others up also. For example, the roof rafters will look small if you build up the timbers below them. But, this is why we insist on the drawing process. You have a tool that will help you see exactly how the structure will look and how strong it is. I would recommend just starting with the standard 16x16 as we have designed it. After you get the drawings and have had a chance to review them, if you are still concerned about strength, instead of signing off on the drawings, just let our Design team that you want to see the support timbers and/or any other timber size beefed up to the next size and we will do this for. As the timbers get larger, the price does go up somewhat, but the bottom-line is we custom build pergolas to suit your needs, so feel free to make changes. But, to start, we recommend going with the standard size so you have a starting point to refer to as you fine tune the design to your needs.
Pole Pergolas
How do I design my Pole Pergola?
There are many ways to configure the pole structure. I will present just one idea for now and you can review and make changes from this starting point, to arrive at what would work best for you.
If we are to cover a total roof space of up to 12′ 5" x 28′ 5" or slightly smaller, we will need at least a 6-post structure. For example, we can build a 6-post version of the 8-post pole structure pictured at right. If you don't like this one, just let us know what you have in mind. I mention this one because it's popular and simple. We place 6 poles in the ground and then run roof support poles between them along the long length (28′ 5"). The 6 post poles should be at least 8" in diameter. The roof support poles can be a bit smaller, maybe 7" in diameter. Once this basic roof structure is up, you can add the "roof" poles in just about any configuration that pleases you. From a more open design as shown in the photo to a more closed design with smaller poles if you prefer.
Please take a look at the several pole pergolas on our site and let us know if any of them are in the direction of what you'd like to accomplish. We can assemble and install the pole pergola for you because you are here in California. We will cut all the posts and make the necessary notching on site. We will also do the necessary concrete work for the posts.
The pole cost is reasonable. If we build the basic structure of the photo with 6 posts and keep the pole spacing of the roof at roughly 3 feet on center, you will need:
- 6 post poles – 12 ft long, 7" minimum diameter
- 4 roof support poles – 14 ft long, 7" minimum diameter
- 9 roof poles – 14 ft long (trimmed to 12' 5"), 5" minimum diameter
- 10 roof timber poles (highest roof level of photo above) – 14 ft long (2 poles will be spliced together at center to cover the 28' span—this won't be visible), 3.5" minimum diameter
How do I assemble a Pole Pergola using your Redwood Poles?
A Pole Pergola is relatively simple to build. You will need a bit of muscle to put it together, but it's healthy fun work. I would buy at least one extra pole in each size to make sure you have everything beforehand. When we build them locally, we have always cut at least one to the wrong size or placed a notch in the wrong place. And, we almost always make at least minor design changes as the structure starts to take shape. What you don't want happening is having to email us a month from now to ship you ONE more post cross country.
We have installed about a dozen pole pergolas in California over the past couple years for customers that didn't want to tackle it. We build them using just a few tools: a small chainsaw to resize and notch the posts, a drill to pre-drill the holes where the lag bolts will be screwed in, a ratchet for the lag bolts, a couple ladders, and a level to make sure everything is straight.
Here are a few pointers we've picked up that will save you time and make the structures last a couple decades at least:
If the pergola is going on undeveloped ground, dig holes a couple feet deep (or below your local frost-line). You can use sonotubing about 8 inches wide or just dig a hole about 10" wide or so and add metal and rebar. Place a metal anchor (like a Simpson Tie brand anchor available at any hardware store in dozens of sizes) about two inches above ground level to dry into the concrete pour. A day after the concrete pour you can attach your posts to these metal anchors with lag bolts.
Make sure your corners are squared before pouring concrete. To square your corners, make sure the diagonals across to each corner are identical in length (or at least to a ¼" difference).
To maximize the life of these beautiful rustic pole pergolas, make sure to elevate the posts a couple inches off the ground (by pouring the concrete that way). This will keep the posts from absorbing constant moisture from the ground and you'll significantly increase their life. Another thing to do is to seal up all the pole ends thoroughly. Use oil-based paint in a color that is closest to the natural wood color so it will blend in and barely be noticeable. Add 2 coats to all the ends to seal them up as much as possible. Take extra time to do this to the ones that will be facing down at ground level.
You'll also need at least one helper with a good back to help hoist the poles in place and basic chainsaw operation and safety knowledge (yes, gloves and a helmet are excellent ideas!). When you are putting up the first pieces, you may need a second helper for a few minutes to hold things in place.
Now the real fun begins. Notch into the bark and a bit into the wood where the poles will meet to "lock" them together and to make the lag bolt go from wood to wood and not from bark to bark. Each spot where a pole meets another pole should be notched this way. Then drill through and attach a lag bolt. We usually use 8-inch log galvanized lag bolts. 3/8" thick is usually enough. As you lay out the poles, notice they all have taper of approximately 1 inch in diameter per 6 to 8 ft. This is the natural shape of the young trees. To compensate for this place the fat ends of the poles in alternating directions—one fat end followed by one thin end followed by one fat (per side), etc. Other than that, be safe and have fun with it. A tiny chainsaw is more than sufficient to do the work. No need for a $500 saw—a $100 chainsaw will do the job fine.
Custom Pergolas
Hi There- I stumbled across your site this evening and am really intrigued. My wife and I are in the process of building a new home in Loomis, CA (suburb of Sacramento) that has rear-facing western exposure and about 24' of glass facing west in our great room - looking out on our future patio/pool/spa. So we're going to need a pergola for shading. We'd been thinking steel for ease of maintenance, but we're open to going with wood as well.
We need:
- Roof area of ~25' w x ~12' deep
- 4 posts, beefy - 8x8 or larger, or possibly 4 4x4s at each post - but the posts will not be centered on the structure, as we need to butt it up against the house to minimize viewability of the closest beams and maintain our view out the back
- Posts about 16' 3" on center apart wide x ~10' deep
- So we need to span ~16' between the posts
- This argues for beefy crossbeams. I like the idea of dual crossbeams at each post, maybe 2 2x12 (or 3x10?) deep notched into the posts
- We're aiming for a height on the structure of 8.5'-9'5'
- This is because we have a set of transom windows above the main sliders/glass area
- We're trying to fit the roof of the pergola between the main windows and the transom windows, so minimizing roof height is a concern for us (can we deep notch/countersink the crossbeams and/or rafters?)
- We need to run some electrical so we can have some vertical electric drop-down shades on the outside of the pergola to shield the great room from the evening sun
- We *may* want to add some curtain rods as well
- I like the idea of a grid structure for the roof (see example referenced below)
- I'm undecided on the top/shade treatment
- Slats or lattice? If slats, 2x2, 2x4 or...? I'd like to let light in but minimize direct sun on the interior of the house
- Wood type: I love the tight grain and deeper hue of the old growth, but would consider the mature as well. The darker the better for our purposes, I think.
- Finish: We're planning on more of a chocolate/dark brown for the interior cabinet color - and matched ceiling beams for the great room. I'd like to ensure whatever we choose for the pergola works with that (not trying to match it - just want to make sure it harmonizes).
- The attached doc from our landscape architect should give you a feel for the overall layout. We're planning to center our raised spa - that will spill into our pool - between the beams. So getting the positioning right is critical. We can coordinate with our concrete guy to pour the needed footings and place the supports where needed.
Good Morning Lance.
Thank you for your detailed presentation. The more OCD with these types of projects, the less work on our end.
We can build pretty much anything you set your eyes on. All the alternatives you have presented can be done.
I am available to speak with you in the mornings. We can set up a time to go thru your ideas Wednesday am (travelling tomorrow) or we can do it via email as well.
The way we normally operate is we send an estimate and if the estimate seems reasonable, we take a deposit, send a preliminary order and begin drawing. I have forwarded your email to Paty Vallejo, our head of engineering.
A job like this requires time. Probably 2 to 3 weeks of drafting different versions and fine tuning details before you are sure you have a winner. Pergolas are traditionally built from wood and there are many reasons for that from the warmth they generate to the way they gracefully age.
A job like yours will be a lot of fun to do. We love the unique jobs like this.
In case you have not seen them, below are a couple links to a 2 minute video of a recent job we built and our Custom Pergolas page with some interesting one off jobs done the past few years.
Please let me know how we can help further.